


"Hayley"
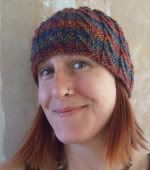
 I designed this pattern specifically for use with handspun yarns, to show off the depth of colour you get with them, especially if you make a 3 ply. I thought a multi-textured fabric would be perfect for the yarn I spun for this hat, and as I wrote the pattern whilst sitting on my favourite Cornish beach, waves and the seaside figured heavily in the inspiration. You can also use any gauge of yarn, because as long as you knit a gauge swatch to find how many stitches you get per inch, and measure your head correctly…..you can’t go wrong with the fit!!! So, it translates perfectly into mill spun too, should you not be a spinner.
 The yarn for this pattern was written specifically for the 4! Oz! Challenge! 2010, using hand dyed fibres from Hello Yarn, Spunky Eclectic and Southern Cross Fibre. It is worsted spun, to a DK/Worsted weight, and it self-stripes, which compliments the construction of the Hat perfectly.
Materials & Tools needed:
Approx 60-100g of handspun yarn/Millspun yarn (DK, Worsted or Aran weights are best)
A needle size up for the weight of yarn (1 x 40cm circular and a set of DPNs for the crown decreases, or alternatively, just one set of DPNs…your choice!!!)
3 Stitch markers: 1 to mark the beginning of your round, and 2 different ones to mark the sides of the hat, where you insert your short rows and do your crown decreases.
A tapestry needle for weaving in ends
Once you have worked out your stitch gauge, you need to cast on the nearest multiple of 4 stitches to the amount of stitches you need (this multiple of 4 also needs to be an even number when halved), allowing maybe a couple of inches for the knitting to stretch. For example, if you have a 22inch head circumference, you’ll need to cast on for 20 inches… say you can attain 5 stitches per inch with your yarn, you must multiply this by 20 = 100 stitches, so cast on 96 (as 96 gives an even number when halved), and the hat will fit!!!
Right, you are ready to start knitting!!!
Use a nice, stretchy cast on. I usually use the long tail cast on, and cast it on with a straight needle a couple of sizes up from the one you are actually going to knit the hat with. I then knit these stitches off the straight needle, (knitting the long tail and the working yarn alternately so you get a nice edge) onto my correct sized circular. This is always my preferred method for casting on bottom up hats. But, if you have your own preferred way too, just use that. Don’t forget to place a stitch marker when you join the knitting in the round, and be careful not to let your knitting become twisted.
Work 2 inches of
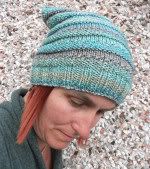
I designed this pattern repeat for texture, to show off the yarn and the colours, but I also wanted the front of the hat to be longer than the back. When I put on a hat, I have usually well disguised the beginning/end of the first round; I search for ages to find the “back”. Designing a hat with a recognizable front and back was one of my aims.
Then you begin the pattern repeat, which is worked over 7 rows, thus….
Row 1, 2 and 3: Work in Reverse stocking stitch (purling)
*On your first repeat, decrease one stitch at the end of the third row. This gives you an odd number of stitches for the moss stitch rows*
Row 4, 5 and 6: Work in Moss stitch (K1, P1 as if to rib, but the rib is uneven because of the odd number of stitches)
Row 7: Knit to 1 stitch beyond the 2nd side marker, wrap the next stitch and turn your work, purling to 1 stitch beyond the 1st side maker and turn your work again. Knit to the end of the row, picking up the wrapped stitch beyond the second side marker as you go.
*On the first row of the next repeat, you can either leave the wrap without picking it up, or pick up the wrap and purl it with the stitch. I have tried both, and there isn’t that much difference*
Continue with this pattern until the hat reaches 6 ½ inches long, or to whatever is your desired length and also make sure you are about to start to row 1 of the pattern repeat.
This is when you’ll want to transfer your knitting to the DPNs (if you’ve been knitting on a circular) as the decreases can get a bit tight towards the end.
Start decreasing for the crown…you will decrease 4 stitches every round for 7 rows (28 in total)
Row 1, 2 and 3: Work in reverse stocking stitch up to two stitches before the first side marker, P2 together, slip marker, P2 together. Work in pattern up to two stitches before the second side marker, P2 together, slip marker, P2 together, and continue in pattern to end of round.
Row 4, 5 and 6: Work in moss stitch up to two stitches before the first side marker, P2 together, slip marker, P2 together. Work in pattern up to two stitches before the second side marker, P2 together, slip marker, P2 together, and continue in pattern to end of round.
*The Moss stitch decreases will not be perfect…but as you are only doing 3 rows, and they are at the sides, they are virtually unnoticeable to anyone*
Row 7: Knit up to two stitches before the first side marker, P2 together, slip marker, P2 together. Work in pattern up to two stitches before the second side marker, P2 together, slip marker, P2 together, and continue in pattern to end of round.
Then, knit again to first side marker and cut yarn.
Do a crochet cast off from the second side marker, and then when you reach the end, you can use the cut yarn to weave in the remaining stitch. Or alternatively, you can graft the top closed from the first side marker, it is really up to you. No blocking is necessary, just don your hat and be proud!!!!
You are free to make hats from this design for charity, but if you want to make them for resale, please contact me to ask if it okay.
Copyright © Sarah Hughes 2010

posted by BabyLongLegs @ 7:09 PM
![]()
0 Comments:
Post a Comment
<< Home