


Cable Twist Handspun Beanie Pattern
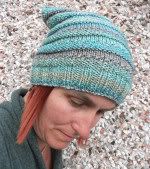
Cable Twist Handspun Beanie
I designed this pattern specifically for use with handspun yarns, because as long as you knit a gauge swatch to find how many stitches you get per inch, and measure your head correctly…..you can’t go wrong with the fit!!!
Materials & Tools needed:
Approx 60-100g of handspun yarn
Correct needles for the weight of yarn (1 circular and a set of DPNs for the crown decreases, or alternatively, just one set of DPNs…your choice!!!)
Stitch marker, to mark the beginning of your round
A tapestry needle for weaving in ends
Once you have worked out your stitch gauge, you need to cast on the nearest multiple of 8 stitches to the amount of stitches you need, allowing maybe a couple of inches for the knitting to stretch. For example, if you have a 22inch head circumference, you’ll need to cast on for 20 inches… say you can attain 5 stitches per inch with your yarn, you must multiply this by 20 = 100 stitches, so cast on 96, and the hat will fit!!! 96 stitches will give you 12 pattern repeats.
Right, you are ready to start knitting!!!
Use a nice, stretchy cast on. I usually use the long tail cast on, and cast it on with a straight needle a couple of sizes up from the one you are actually going to knit the hat with… I then knit these stitches off the straight needle, onto my correct sized circular.
The cable twist pattern is worked over 8 stitches, 5 knit stitches and 3 purl stitches, thus….
Row 1: *left twist, Knit 3, Purl 3, repeat from * to end of round
Row 2: *Knit 5, Purl 3, repeat from * to end of round
Row 3: *Knit 1, left twist, Knit 2, Purl 3, repeat from * to end of round
Row 4: *Knit 5, Purl 3, repeat from * to end of round
Row 5: *Knit 2, left twist, Knit 1, Purl 3, repeat from * to end of round
Row 6: *Knit 5, Purl 3, repeat from * to end of round
Row 7: *Knit 3, left twist, Purl 3, repeat from * to end of round
Row 8: *Knit 5, Purl 3, repeat from * to end of round
The left twist stitch is worked thus…
Put your right hand needle into the second stitch on your left hand needle through the back of the loop, and knit it. Without slipping this stitch off the needle, slip the first stitch purlwise onto your right hand needle, and let the second stitch slip off too.
Continue with this pattern until the hat reaches 6 ½ inches long, or to whatever is your desired length and also make sure you have come to row 8 of the pattern repeat…
This is when you’ll want to transfer your knitting to the DPNs, if you’ve been knitting on a circular)
Start decreasing for the crown…
Row 1: *Knit 2 tog TBL, Knit 3, Purl 3, repeat from * to end of round
Row 2: *Knit 4, Purl 3, repeat from * to end of round
Row 3: *Knit 2 tog TBL, Knit 2, Purl 3, repeat from * to end of round
Row 4: *Knit 3, Purl 3, repeat from * to end of round
Row 5: *Knit 2 tog TBL, Knit 1, Purl 3, repeat from * to end of round
Row 6: *Knit 2, Purl 3, repeat from * to end of round
Row 7: *Knit 2 tog TBL, Purl 3, repeat from * to end of round
Row 8: *Knit 1, Purl 3, repeat from * to end of round
From now on, you’ll be missing out the even numbered non- decreasing row, and decreasing for every row until you have 4 stitches left…
Row 9: *Knit 2 tog TBL, Purl 2, repeat from * to end of round
Row 10: *Knit 2 tog TBL, Purl 1, repeat from * to end of round
Row 11: *Knit 2 tog TBL, repeat from * to end of round
…keep repeating the Knit 2 together TBL until you have 4 stitches left on your needles, then cut your yarn, thread the needle onto it, and run this through your remaining crown stitches. Weave in all your ends, and voila…..you have a new hat!!!
Enjoy!!!
posted by BabyLongLegs @ 10:00 PM
![]()
0 Comments:
Post a Comment
<< Home